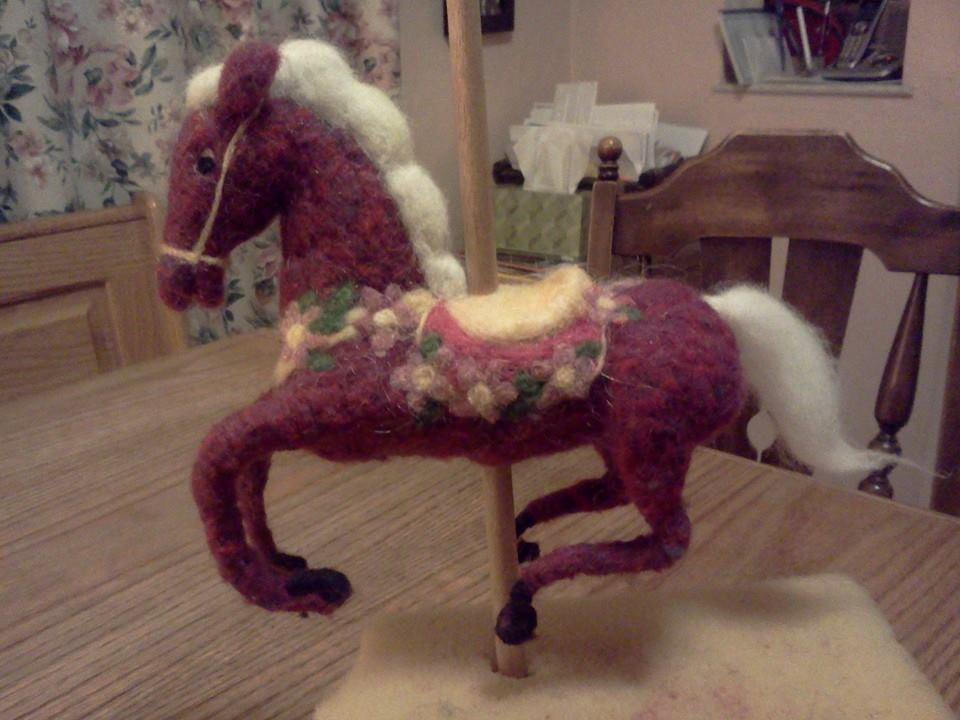
Finished Carousel
Terri Reinhart
Did I say I was going to do thirty days of crafting? That didn't last long. I have many excuses, but none of them are very good, so I'll just post the photos I have of the carousel.
Use the form on the right to contact us.
You can edit the text in this area, and change where the contact form on the right submits to, by entering edit mode using the modes on the bottom right.
123 Street Avenue, City Town, 99999
(123) 555-6789
email@address.com
You can set your address, phone number, email and site description in the settings tab.
Link to read me page with more information.
In which one may learn many useful things, such as how to knit a bat or needle felt a bunny.
Filtering by Author: Terri Reinhart
Did I say I was going to do thirty days of crafting? That didn't last long. I have many excuses, but none of them are very good, so I'll just post the photos I have of the carousel.


Or thirty days, more or less, of crafting.
I have been working on crafts everyday, but I've fallen behind in posting. Here are some photos to show you how the carousel horse is developing:

Here, of course, is the wire form, made from 20 gauge florist wire. After trying a lot of different types of wire, I settled on this as it is easy to work with and inexpensive. I always start the wire form by folding the piece of wire in half. The middle fold is the nose of an animal or the neck for a gnome.

The beginning! In one of the last posts, I explained about how to wrap the folded ends - in this case, the nose and the hooves. Taking the time to do this makes it easier later on to complete those parts without the wire sticking through. DON'T FORGET TO PUT THE STICK WHERE IT NEEDS TO BE BEFORE WRAPPING THE HORSES BODY!!
Okay. I did forget on two of them - no, three. It was a pain to try and make a hole in the horse after I had felted it firmly. You won't make that mistake because I've warned you.

Here's one which is nearly ready to add the top layer of color. These have all started out blue because I had a lot of blue wool I knew I wasn't going to use for anything else.

What do you call a bunch of horses on sticks? HORSE D'OEUVRES!
Next - putting on the finishing colors and designs.
I didn't get much crafting done today. I didn't get much writing done, either. But our grandson was over for the day and we had a great time. So, tonight's blog entry is simple. Lexus is giving her critique of the needle felted mice.

I love the idea of making a carousel with needle felted horses, but had no idea if I could pull it off. I'm still not sure. We'll see. Here I will show you the beginnings of how to make the horses and how I plan to create the carousel.
First the horse - I posted the photo of the wire frame yesterday. Here is my trick to forming the wire base for animals, people, and gnomes. Take a piece of wire that is longer than you think you need. Eventually, you'll be able to gauge the length easier. For now, it's better to have it too long than too short. Fold the wire in half.
The center of the wire will be the head of the figure. If it is a person, the part of the wire going into the head doesn't have to be very long. A half inch or so would be sufficient. With animals, it's a little different. The center of the wire will form the snout. With a small animal, like a mouse or chipmunk, this allows you to easily make the nose, right at the end of the wire, by wrapping the bend of the wire in the desired color. The horse, however, doesn't have a pointy nose, so the wire simply comes down to form the head.
Bend the wire for the head and neck, then continue, holding both ends of the wire together, to form the front legs, body, and back legs. You should have enough wire to bend it so the back leg wires are also doubled.
To wrap the wire and begin felting, I always start with the feet and head - or - those places where the wire folds back on itself. Begin by wrapping a very thin piece of wool around one wire, starting before the bend. After you have wrapped past that point, fold the wire and pinch it tight. Continue to wrap both wires together. When making a horse, I do the same thing with each of the four feet. This helps to prevent the wire from pulling through the wool.


Here is the wire frame for my first carousel horse. I have it bent to the approximate shape I will want it to be. I will still be able to change it.

The horse, or beginning of the horse, is sitting on what will be the base of the carousel. I found a lovely wooden lazy susan to use for the base. As it already turns, it solves my first engineering challenge. There will be a post in the center - taken from an old standing lamp.

My plan is to have 4 horses around the edge and 4 more inside the circle. Now, how to make the inside horses go up and down when the carousel is turned?
More coming tomorrow. This is being posted as I experiment and create it. I have no idea how it will turn out!
Here are some more needle felted flowers. They are made much in the same way as the dandelion. I rounded out the wire loop at the top and felted around it in brown, then added the petals.

Here's a small garden. I like this one with the different colors of green.

This next one is a yellow dandelion with a bumblebee.

And here is a clover. The clover blossoms are made just like the dandelion flowers, just in a pale purple. I made one plant with stems going every which way, just like the clover in my garden. There are many more leaves on the real plant, but this gives the idea, anyway. I was going to put this one in the fair, but I like how it looks behind our Buddha.
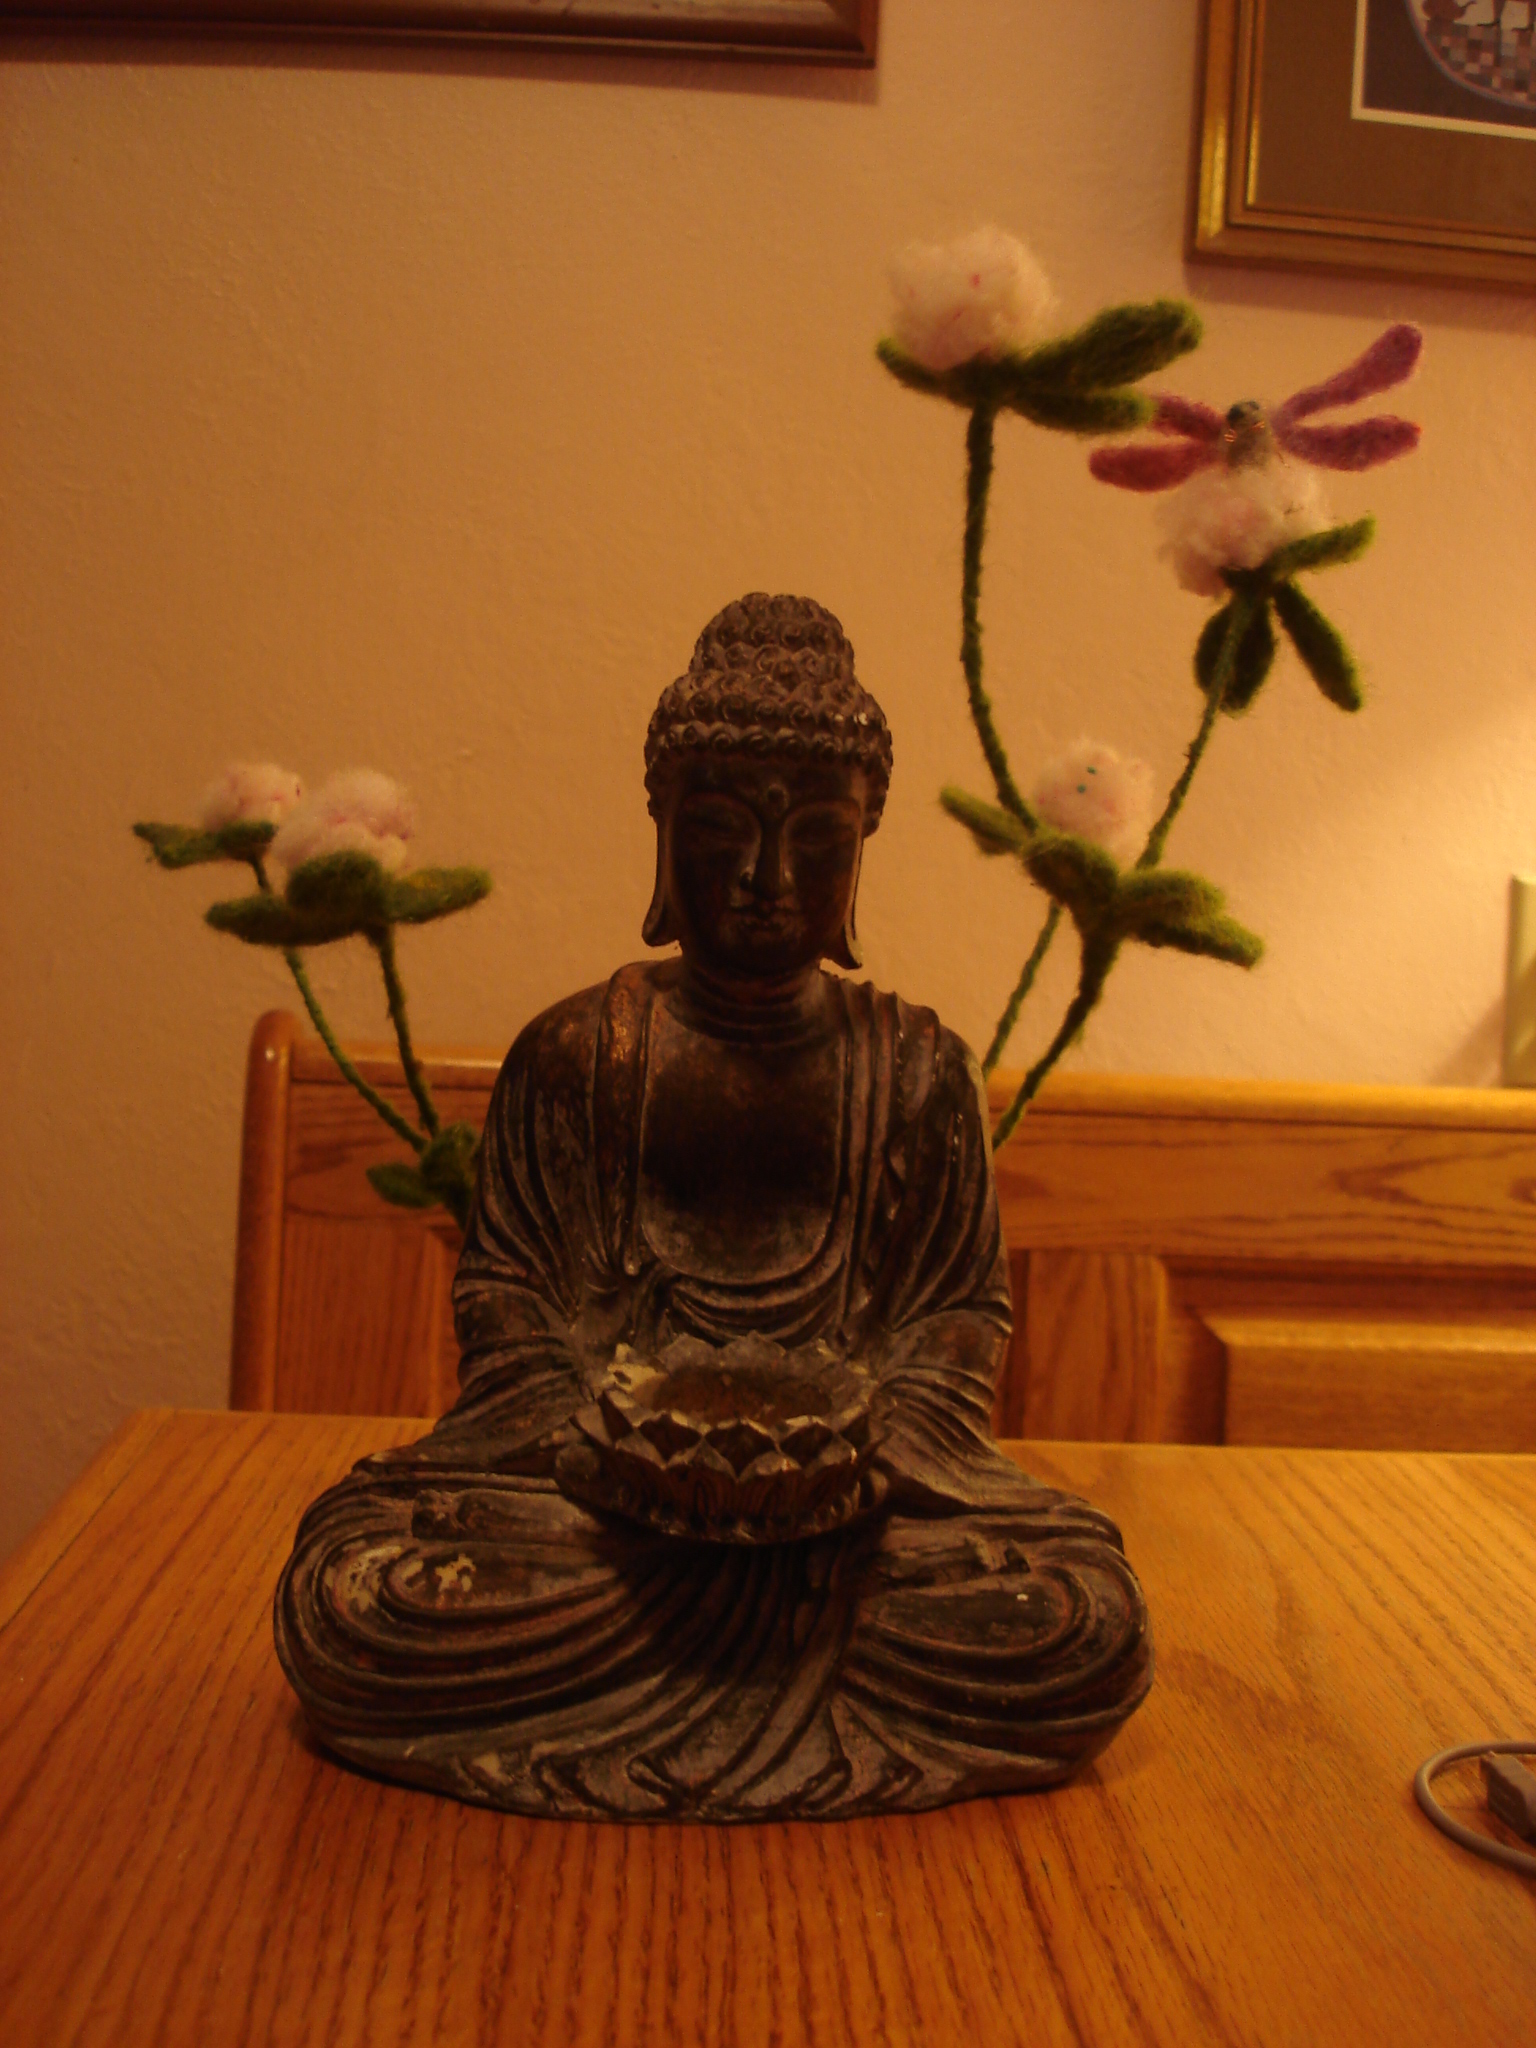
That's a needle felted dragonfly sitting on the clover blossom!
Next up - step by step photos of a needle felted carousel horse.

Here is the finished dandelion so you know what yours will look like. You'll need wire (22 gauge florist wire), needle nosed pliers, green wool, white wool roving, a felting needle, and a foam mat to felt on. Tomorrow I'll add some photos of other types of flowers made in the same way.

Start by making a wire form like the one below. I use a 22 gauge floral wire.

Wrap the wire with green wool. The ground can be a different color green or it can be the same as the stem. Felt the bottom part. You probably won't have to felt the stem, just wrap it tightly, pulling the last bit thin and continuing to wrap, even with just a few threads of wool. Do not wrap the loop on top!

Now comes the fun part! Take a thin "rope" of wool roving - it must be roving - and wind in through the loop over and over, leaving a finger's width of space. Sometimes I thread the wool through a large blunt sewing needle. It makes it easier to go through the wire loop.

Wrap the wool through the loop until it is full. Then you will pull all the loops up towards the top of the wire loop and, with your needle nosed pliers, pinch the wire closed. Your dandelion will look a little shaggy at this point.

Now it's time to clean it up a bit. Add more green to the stem so it is completely covered. Cut the loops with a sharp scissors and trim your dandelion down so it's more or less globe shaped. Don't overdo it. It's easy to see little uneven spots and keep trimming until there's nothing left!

Now you have a nice, neat flower that is ready for leaves. This I'm leaving more to you. I'm not sure my leaves look all that much like dandelion leaves. Anyway, you use the basic needle felting technique with a somewhat leaf shaped blob of wool and you work on it until it is shaped the way you want it - or until it's close enough to what you want. The next photo is a close-up of one of my leaves.

It's November, which means a lot to writers. I signed up this year to be a part of NaNoWriMo or National Novel Writing Month. This is when authors, professionals, beginners, and everyone in between, go into a frenzy and attempt to write 1666 words per day to a total of 50, 000 words for the month.
It's also NaBloPoMo or National Blog Posting Month. The idea is to write a post on our blog every single day for the month of November. I wasn't sure about this one at first, but I'm going to give it a go. Instead of articles, I will post a craft project each day. This is because I'm also getting ready for a craft fair in early December.
This first picture is my first attempt at a carousel horse. Eventually, there will be up to 8 horses on a wooden carousel. I will post updates. I also hope to put up as many instructions for making these figures as I can.

This toad reminds me of the toads we used to find in northeastern Colorado. Kit Hedman took the photo and posted it on Facebook. A number of people thought it was real and wondered how there could be a fuzzy toad!
Here is the video Sally followed to make her gnome. It's not the best quality, but it obviously works!
Often when someone follows one of my patterns, they end up with a finished project so uniquely their own, I just have to post a photo! I love the addition of the bird, mouse, and bunny. Thank you, Sally, for sharing with us!!
congratulations Sally!
This is a simple little gnome we used to knit and give as a birthday gift in the kindergarten. It takes very little yarn and can be made completely from your assortment of odd balls! (Photo to come shortly)
Materials needed: odd balls of worsted weight yarn, three different colors plus flesh color; size 5 or 6 knitting needles; yarn or a bit of wool fleece for eyes; yarn for beard; felting needle, yarn needle.
Body and head:
Cast on 20 sts to start the body. Knit every row until the piece measures 2 1/4". This will probably be about 14 rows. Change to the flesh colored yarn. Work in stockinette stitch (knit one row, purl one row) until the head measures 1 1/4". Next row: Knit 2 together, repeat across row. Cut yarn, leaving about 8 inches. With yarn needle, thread yarn through all the remaining stitches, slipping them off the knitting needle. Pull tight and knot.
Arm and Hand (make two):
Cast on 8 sts in body color. Knit every row until piece measures 1 1/2". Change to flesh color and stockinette stitch. Work two rows. Next row, knit 2 together, knit 4, knit 2 together. Purl next row. Work four more rows. Cut yarn, leaving an 8" tail. With yarn needle, pull thread through stitches and slip sts off needle. Pull tight and knot. Don't forget to make the other arm!
Shoes (make two):
Cast on 6 sts in shoe color. Knit every row for 2 1/2". Bind off.
Hat (make one):
Cast on 20 sts in hat color. Knit 4 rows. Beginning with the next row, knit 2 stitches together at the beginning of every row. When there are only two stitches remaining, slip yarn through those stitches and pull tight. Knot.
Sewing:
With yarn needle, and keeping colors to match whatever part you are sewing, sew the seam from the top of the head down to the end of the piece. Leave the bottom seam open for stuffing. Firmly stuff some wool into the head and body. Weave a piece of yarn through the stitches around the neck. Pull to form the neck and knot. Make sure there is enough stuffing in the head and body so it is firm. Sew the bottom seam - the vertical seam will be in the middle of the back. Sew a few stitches up the center to define the legs. It doesn't take more than 2 or 3 sts.
Sew the arm seam from the hand down. The arms don't necessarily need stuffing, but you can stuff the extra bits of yarn into them.
Sew the hat seam from the tip down. Fold the shoes in half, length wise, and sew into small rectangles. You can put a piece of cardboard in the shoes to help the gnome stand up easier.
Sew the arms and shoes onto the body in the appropriate places. Sew the hat onto the head, set back a little so there is plenty of room for the face. I prefer to needle felt the eyes in with some dark brown wool. It is easier to control the needle felting than it is to figure out just where to sew the eyes, but either way is fine.
Beard:
Choose a nice mohair, or mohair boucle, if possible, for the beard. If you don't have access to mohair, any fine yarn will work. Thread the yarn needle and sewing, make a big loop and secure it with a knot. Repeat all around face for hair and beard. Cut loops in yarn, if desired.